Wednesday, October 16, 2013

Printmaking: "Children at Play, book"

Y'all remember my Occshell, right? He is one of my Lunamals! Well I finally figured out a way to incorporate him into my current body of work. After my previous disaster in Printmaking, I decided to go back to something I know and I am good at, relief. Linoleum if my bread a butter in printmaking and when push comes to shove it is what I love the most.

My first project in Ceramics was "Children at Play" a piece which features a girl who will be sitting against a children at play sign reading a book. But what book will she be reading? I am glad you asked. I can't get the Lunamals out of my brain so why not start writing the book that took up so much of my time this summer. The page my ceramic piece will be reading will be an excerpt from a field journal I have been wanting to write about the world I created in which the Lunamals live. Being one of my first Lunamals I felt it appropriate to illustrate the first meeting with the strange creature, the Occshell.

This 12"x 8" piece was pretty straight forward. I did two relief prints in three color reduction to create a full image of an Occshell in one corner and the scene that was illustrated in the words on the opposite page. The words were done using photo emulsion screen printing. I also took one of the prints and did a quick water color layer on top. That gave the desired effect I was looking for.  Check out each layer in the images.

I am pleased with the piece and it has definitely made me more excited to continue this story. Who knows where else these little Lunamals will take me.

Here is the story I wrote...
"On my second day traveling up the side of the mountain, I cam across a different type of Lunamal. I almost missed them as I made my way up the rough trail because their shells blended into the mossy trail. I would have passed them all by, if they were not the reason for the trail being present at all. Their camouflage is very misleading, and I now understand why these Lunamals are not afraid of leaving a trail for other predators. The group was resting under what little shade the vine trees gave. There were 14 in all. Three of the massive ancient looking creatures dozed locked away in their large shells while the 11 younglings played in a small pool carved into the thick rock that made up the mountain's surface.

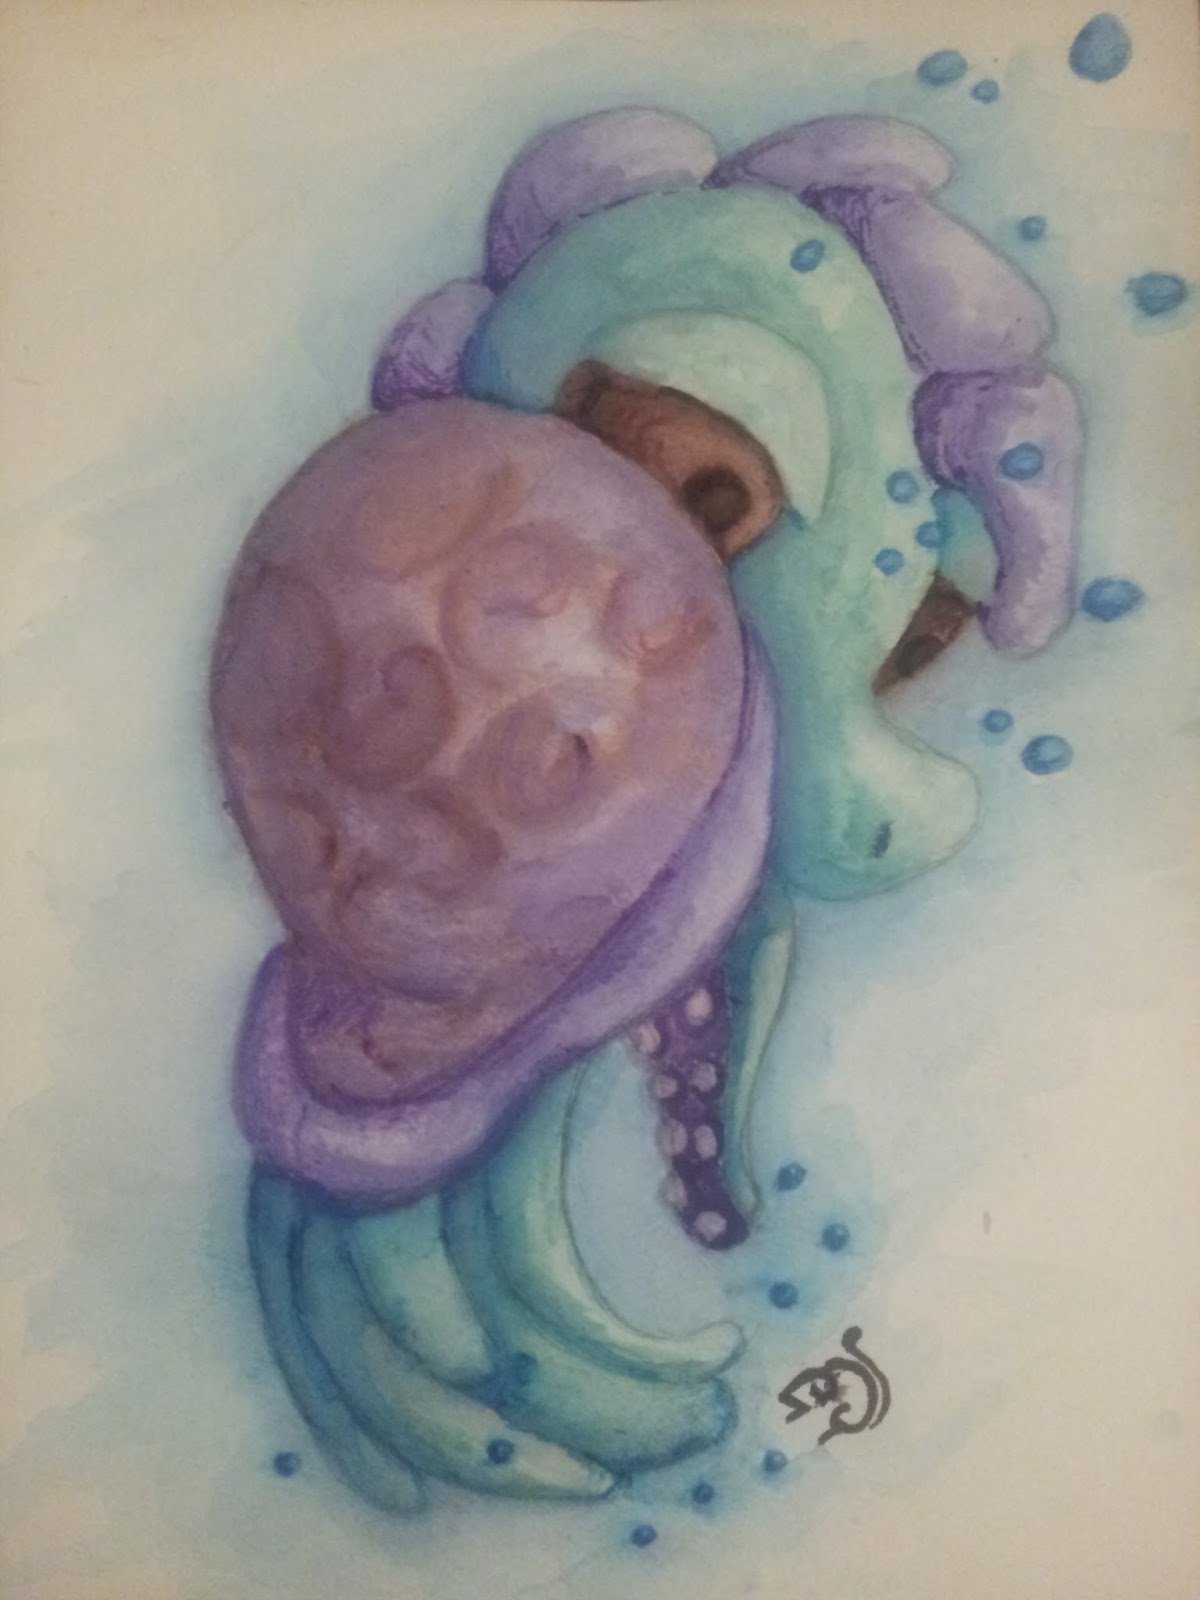
I have decided to name them Occshell. When I first saw these Lunamals, they resembled animals from Earth's Oceans. It looked like an octopus wearing a turtle's shell. I was surprised by the Occshell's variation in size. The largest was six-foot long and looked as if it had seen more seasons on this planet than I ever hoped too. The younglings, however were barely larger than my forearm and their colors shimmered as they swirled across their smooth shells. It was mesmerizing to watch.

As I crept into the clearing, my boot dislodged a small rock. The rock hit the rocky terrain and alerted the creatures to my presence. The heads of the three adults whipped around to stare at me as I intruded on their peaceful rest. I suddenly froze. After a few heart pounding minutes, the Occshells decided I was not dangerous and returned to their nap. All of the adult Occshells laid back down, but one on of them had their eyes fixated on me as I slowly backed away. She was the smallest of the three but could probably still crush me under the vast weight of her shell. I wold have to come back another time, when they were awake and less grumpy to have a better chance to study these Lunamals."


Tuesday, October 15, 2013

Printmaking: "The Journey"


This semester in Printmaking I decided to dive deeper into Reductive Screen Printing, and I might have bitten off more than I could chew. The piece is called "The Journey."


For those of you unfamiliar with reductive screen print, it is a process using a silk screen. To get a good idea of how this process works check out this video.


First you decide what your image is going to be. I choose to do a girl carrying an angel doll walking through the forest. Originally the piece had a lamp post but that was eventually taken out for fear of being redundant, and simply because I ran out of time on this piece.


Once I have a good layout of how I want my final piece to look I begin with the back ground. Using screen filler I blocked off the area of my screen where I wanted the paper to show. For my first run, it was the border of the page and a small pool of light were the moon will be hitting the ground. I then printed a light blue color. The areas where I painted the screen filler remained white and the rest of the image was light blue. I then decided where I wanted the light blue to stay and ran a slightly darker blue. With each layer the moon light spreads across the page giving me my foundation.


Next, I worked on the back ground trees. I began by blocking off an outline of the trees and bushes that made up the back ground and printed a dark green. I then printed a medium green and light green on top of that giving the trees depth. This process continued until my forest scene came to life. I think blanked the forest in snow before adding my girl to the image.


Twenty-seven colors later I have a piece. While I layered each section one on top of the other, most artist would have created this image all from one reduction. This is where I think my piece got away from me. With the method I used, I could have gone on and on forever layering one thing after another on the page. It was overwhelming and I didn't know when to stop. Eventually, I just had to stop because I ran out of time and the piece was due.


I guess the lesson from this one is just plan what you are going to do before you do it, expecially with a process this complex. I was able to get an okay print out of the hours and hours of work I put into it but I could have made it much easier on myself by planning out each step and not trying  something I had only done a few times before.


Now it's back to the drawing board. Hopefully, my next piece will be better executed, and more my style.


Monday, October 14, 2013

Visiting Artist: Linda Swanson

Last week, we were lucky enough to have Linda Swanson visit our ceramics studio. She is a ceramic artist who focuses on the raw materials used in ceramics and how they change and react to each other over time.  
Our ceramics class was lucky enough to work with her during her week stay at Midwestern State University.  She preformed a demonstration for us about transferring images to the clay body through a couple different methods including how to screen print on clay. This method fascinated me the most because I have been working in screen printing some over the past month. It was exciting to be able to use those same techniques in ceramics as well. The night before the class I had emulsified a screen and exposed one of my images. It was the perfect opportunity to try to transfer that image onto clay. It turned out pretty well and this technique is one I am excited to explore after I graduate. 

She also set up an installation piece while she was here. We were given the opportunity to help her construct the wall piece and even add our own touches to the work. It was so much fun working with Linda on this piece. It is so different from my own work and I enjoyed the freedom we had to create whatever we wanted.  Somehow all of our ideas meshed well and the piece looks great. We are now in the process of cutting the piece down and preparing it to be wood fired later on this fall. It will be exciting to see how it turns out.

Linda is such a free spirit and her way of looking at ceramics is so fascinating. It was great to work with her while she was here and I am sad to see her leave. If you would like to see Linda's work when she is not teaching, here is a link to her work (click here). I am very grateful to our professor Steve Hilton for providing us with so many opportunities to meet, learn from and work with so many artists. I learn so much from every person who walks through the studio doors, and am grateful for him for providing us with these learning opportunities.
My first attempt at screen printing on bisque ware.
Working on the installation piece.
Linda Swanson throwing some texture onto the piece
The installation piece we worked on with artist Linda Swanson.
 

Thursday, October 3, 2013

Ceramics: "Children at Play"


 I kicked off my final semester in Ceramics with high hopes and big goals. With graduation and my senior show right around the corner, I knew I needed to build quickly if I wanted to get a few more pieces complete before my show opened in December.

I had a few life size pieces in mind when the semester started and those pieces take the most time to dry. The method I use to build my work consists of building a solid structure and hollowing it out. This method allows me to build large figures very quickly, but the drying time can be up to 4 months depending on the thickness. 

With all of this in mind I got to work on my first large figure, "Children at Play." As some of you may know, a lot of my work is mixed media. Usually I use my large Ceramic figures as the main focus of my pieces and then add other elements to pull the pieces into reality. In the case of this figure I will be using a metal Children at Play sign and a book to go along with my ceramic figure. The girl will be sitting at the base of the sign and will be holding the book in her hand.

Since this is my first blog entry where I was able to get pictures through out my building process I thought I would let y'all in on a few of my "secret building methods." As I mentioned before, I work from a solid piece and hollow it out later. I begin with an armature that usually consists of metal piping that is attached to the board I am working on. For those of you don't know, and armature is a support structure used to help keep the clay in place while a sculpture is building. Think of it like your skeletal system. Without our skeleton our body would cave in on itself and we would be a floppy mess laying on the floor. The same is true in ceramics. The clay we use is similar to mud (sort of). The more water it has the more of a soupy mess it becomes. However clay has the ability to be as hard as a rock when it is fired. Like muscle it does have the ability to support itself but it needs a little help from the armature when it has a lot of moisture in it.

So I build up the clay around the armature until I have the basic layout of the figure I am trying to create complete. This takes time and a lot of tweaking to get things proportionally correct and looking the way I envisioned it. Once I am satisfied with the way it looks I then do something that may seem a little scary...I cut it into pieces. I know it seems backwards to destroy something you spent a long time to make, but it is an important step. Clay has this fun property, it shrinks as it dries. While slapping clay together to make my solid figure I risk trapping air in the clay. As the clay dries it compresses the air trapped in the clay causing a lot of pressure. While clay is pores and can release some of the air, however if the air is released to quickly or there is enough pressure it can cause the clay to crack or even explode in the kiln. To avoid this we make the clay walls as thin as possible while still allowing enough to support the structure itself.

Once the piece has been hollowed out I then begin to put it back together again. These are the days I feel like a surgeon. Each piece has to be placed carefully back together. If the pieces don't line up I have to add clay to make it fit back together flawlessly. I then need stitch the seams back together. Yes you heard me correctly, stitch. I seal the seams by pushing the clay into the crack where two pieces meet. This compression forces the clay together and forms a bond between the two pieces. I then add extra clay on top of the seam and smooth the whole piece out so that you cannot tell where one pieces begins and another ends.

Once all of the pieces are back together I then begin the fun part, detail. Up to this point you can tell what the piece will be but it still looks like a giant lump of clay. As you carve in the detail the piece begins to come to life. Adding fingers and toes, eyes and hair, the figure goes from being a blob to a person. Add some stitches to her legs and suddenly she is wearing pants. Its amazing what a little bit of texture and line work can do to make a piece become something.

There are a few ways to do this method of building and I have only demonstrated one way to working. While I hollow out a basic shape and add the details later in the process, some artists will build their pieces complete with all of the detail before hollowing it out. While there are arguments as to which method is "better" I must say that if you try to add the details after you hollow out your piece you need to pay close attention to how thick on thin your piece is in certain places. You have to keep in mind that if you add clay or subtract clay after it is hollow without carefully planning it out before hand it can lead to uneven wall thickness. I have learned from experience that having a piece built with variations in thickness can lead to your piece drying unevenly and cracks can occur. I have had arms and legs fall of of my pieces and chunks pop off during a firing. It has taken a lot of trial and error to prefect this way of building and to be honest I am no where close to being perfect and building this way.
 
Once a piece is done, you then have to spend the next two months baby sitting it. This is the part of ceramics that many people have trouble with. You have just spent countless hours on a piece but the work is not over yet. As I mentioned before wall thickness, trapped air and uneven drying can lead to your piece cracking and falling apart. No matter how careful you were while building your piece, letting it dry slowly and evenly is extremely important if you want to have a whole figure when you take it out of the kiln.

While I am finished with this piece for now, there is still a lot of work left to do on it. Once it is bone dry, I will place the piece in the kiln and fire it to bisque temperature. We fire our bisque kiln to cone 04, which for all of you non-ceramicists is around 1950 degrees Fahrenheit. At this stage (bisque ware) it is still pores enough to accept glaze but strong enough to support itself. I will then glaze this piece using under glaze before adding the other mix media elements to this piece.

Overall, this piece turned out pretty good. I am pleased with the amount of detail I was able to put on it in such a short amount of time, and while I would love to push the piece even farther I have deadlines to keep and more figures to construct before the semester is complete. So onward to the next project!

If you have any questions about my methods or would like me to further define any of the terms I used, please place a comment below or ask away on my facebook page. I hope you enjoyed this little explanation about how I do what I do. Stay tuned for more projects from this semester, and keep an eye out for more picture of this piece once it is complete!


"Children at Play" Ceramics, Leather Hard Stage

Thursday, September 5, 2013

Art Camp 2013


Every Fall at Midwestern State University, the Art Department holds a two day "camp" for all of the art students to collaborate and make some artwork together. This is a chance for the students to come together and help each other produce art. Most of the time we spend our days in the studio working on our own pieces and besides a suggestion or two and critic,
it is difficult to really work together on a project. It has been going on for quite a few years now and I have had the privilege of being a part of a few of them. This year the theme was "Original Rodeo." We were given the chance to do an installation that would follow the theme.

The first day was spent cutting out and painting large flat silhouettes of random animals and people. I choose to help out with a flying pig and painted a jackalope with the help of one of my fellow students Sammie. The Starry Night side was inspired by our professor Dr. Leimer and painted by Sammie, I painted the other side. The pig was also double sided and Sammie and I painted the "Heavenly pig" and some of the other student painted the other side.


Day two of art camp we put the final touches on some of the other pieces that were going in the installation including a giant bull, lots of cacti and even a drag queen. I helped finish up some of the people in the crowd and by the time I left for lunch they were ready to hang.


The Exhibition Preparator Carlos and his student gallery assistant Sydney did an amazing job putting up the gallery. It will be up for the next few weeks and if you have the time you need to come by and see it. It will be on display in the Foyer Gallery at the Fain Fine Arts Building. 

Tuesday, August 13, 2013

Sketching Daily: Self-Portrait

 One of the challenges someone gave me a few weeks ago was to do a self portrait. It has been a long time since I last sat down a did a sketch of myself and it got me thinking of some of the old pictures I drew. Of course like we all do when we run across a binder full of old pictures (or in this case sketches) I spent a good two hours just flipping through them. I was really big into anime when I was younger and it got me thinking of what it would look like if I tried to draw like that now, and besides it is still an "in" style.


So this is what I came up with. It is simple and I added the watercolor touch that I have been playing around with the past few weeks and I have to say I am rather pleased with the simplicity. All of the rats featured in this sketch are the rats I have now and the two that have passed away.

To read more about my rats, check out the blog post they wrote a while back, click here!

On the far left is Kira, who is my oldest living rat. She is the second rat I ever had. She is getting old and likes to spend most of her time sleeping, but she has always been a snuggle bug.

Climbing my pant leg is Hershey, who is one of my newest rats. She is a big goofball and loves to chase my feet.

Marshmallow, another newbie, is on my head like usual. She is a little ball of energy and likes to play.

Patch is sitting on my shoulder and is one of the rats that has passed away. She was sweet but a little slow at times and died of a sudden illness that she couldn't get over.

Shorty is sitting in my lap hiding. She is really shy (due to the fact that she is blind) but while she is a scardy cat when it comes to new things she is tough and is currently my alpha.

Kita is my first rat and she is seen trying to get under my leg. She died from old age one evening and is very missed. She was goofy and adventurous and liked to get into everything.

And last is Phantom who is seen on the far right chewing one a piece of food she found. She is my little scavenger and while she is starting to slow down as she gets older she still will jump across the room when she discovers a little treasure.

Hope you enjoyed this Sketching Daily Challenge. As the semester gets closer it has been harder to keep up with my challenge,  but I will still try to get to everyone's suggestions. So keep them coming!

Monday, August 5, 2013

Lunamal: Occshell

Meet the Occshell! This Lunamal was one of my first creatures and I didn't even know it at the time. He is inspired by one of my sketching daily challenges. He is a turtle-octopus hybrid and while it is built for the water, it does surprising well on land.

His body is built just like an octopus with no major bone structure. This gives him the flexibility he needs to be fast in the water, but leaves him venerable while on land. He protects himself by squeezing his body into his shell and can manipulate his skin and shell pigment to colors in the families of grey, brown, purple, green and blue.

He has 8 tentacles, 6 positioned on the back end of his shell and two that are attached to his body just below his head. The front tentacles are shorter and have suction cups running along them that they use for climbing and holding on to objects. When moving he will stand on his back tentacles using the front two for balance. While he travels very slowly on land, he is one of the fastest creatures in the water. He uses his shell like a pump and will push water out of his shell for quick take offs or for quick bursts of speed.

Similar to a turtle, the Occshell will lay its eggs once a year before the ice moon enters the atmosphere. Unlike turtles who can mate with multiple partners in one season, Occshells will mate for life. Once their mate dies they will then find another partner. During the time of the crater moon, the mated pair of Occshell will dig deep into the earth to lay its eggs. Once the eggs are laid they will pull them into their shell and keep them safe while hibernating during the ice moon. As the ice melts and the water moon appears in the sky, the Occshell are flushed out of their holes and will release their hatchlings into the water. They grow quickly during the water moon and will reach 6 inches in length by the time the moon leaves the atmosphere. The Occshell will continue growing its whole life. Once it's shell reaches 8 inches in length, its growth will slow and it might only grow half an inch a year after that.

During their first few seasons, they will stick to bodies of water until they are large enough to fend for themselves on land, and even then will live in large groups until it is sexually mature. The occshell has very keen eyesight and sense of touch, it uses both of these to locate his food. While an omnivore, he prefers to eat small Lunamal they can find in the mud and sand. On land and during the dry seasons, they will stick mainly to vegetation. While they grow quickly the occshell will not reach sexual maturity until 15-20 years of age, and can live until they are 80-100 years old. There are some that have been reported to live upwards of 150 years. However once they are 80 years old, the female occshell will stop producing eggs. Their male partner will stay with them until ether the female dies or it dies. If the female dies first it can then find another partner and continue breeding. If the male dies the female will join other older pairings. Small colonies of old female occshell can be found living together.

The Occshell is very social, and it is rare to see one living alone. They have been known to follow other large  Lunamal until it finds other Occshell to colonize with. It is not unusual for an older Occshell to be seen with young hatchlings. While the parents do not teach their young how to survive, rogues will adopt a young group and teach them what to eat and how to live. This is crutial to the young Occshell's survival and without this guidance a colony of hatchlings will not make it through their first year.