Thursday, July 24, 2014

Texas State Aquarium: Corpus Christi, Texas

One of the most essential things you can to to become a better artist is to sketch. No matter what your medium, no matter what your style, learning how to draw realistic images is key to becoming a better artists. It may seem strange when you think about cartoonists, surrealists and even abstract artists, but every artist needs to have a firm grasp of reality before they can have the confidence to alter it.

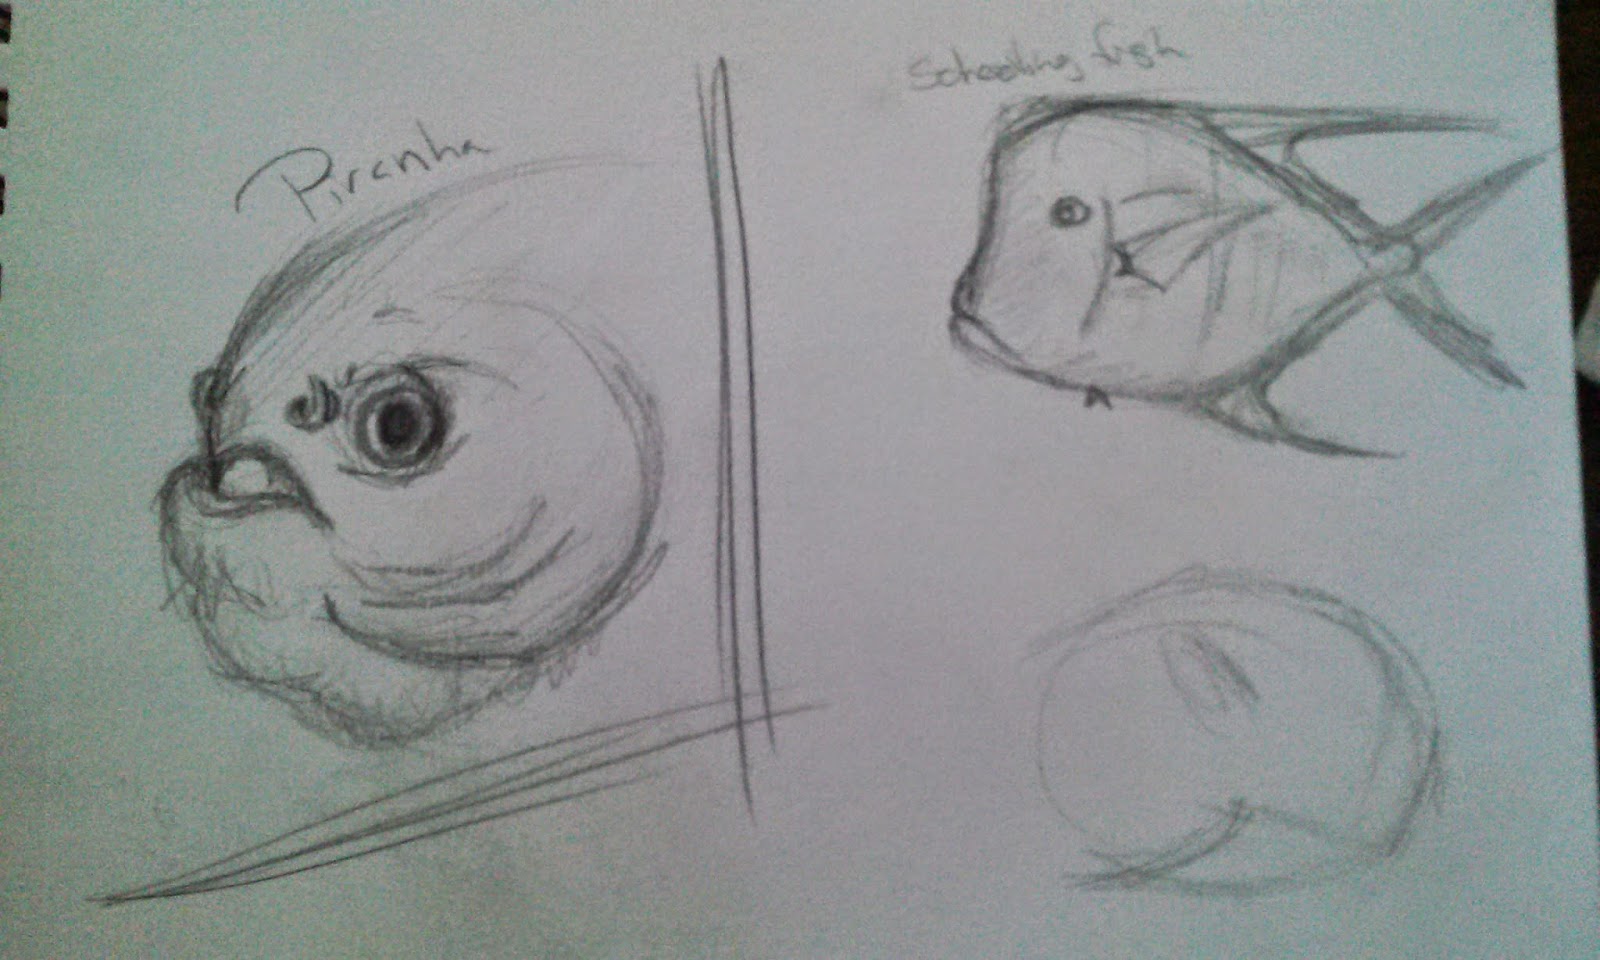
I had the wonderful opportunity to visit the Texas State Aquarium in Corpus Christi, Texas. If you have never been there I highly recommend it. This sanctuary is more than just a place to see fish and crabs. It is home to a large variety of other animals such as birds, frogs, sea turtles, dolphins, sea otters and many others. Every time I visit a zoo or aquarium I never forget to bring my sketch book. Animals, especially a group of this variety, makes for excellent sketching practice.

If you ever have a chance to visit the Texas State Aquarium or any zoo, aquarium or wildlife sanctuary I recommend going early when they first open or during their slow hours and visit the areas of the park that don't have shows going on. Actually if you can get to an exhibit after a show then the animals will still be active without the huge crowds.

If you are wanting to sketch a specific animal, research what times the animal is most active. Porcupines for example are nocturnal and will be the most active in the early hours of the morning and right before the exhibit closes in the evenings. The Porcupine at the Texas State Aquarium is most active after 5 pm because that is when he gets fed. You can get some great views of him eating which is really fun to sketch. Another good tip is to wear the same color of clothing that the zoo keepers and staff wear. It is the most familiar color to these animals and it may even attract some animals towards you to get better views.

And the best advice I can give you is to be patient. Between animals who are shy and little kids getting in front of you, sketching at a zoo can get very frustrating very quickly. I will spend upwards of 45 minutes at one exhibit just trying to get one sketch of animal. A few ways I try to avoid this is by placing myself in a corner or near the edge of the exhibit away from the main flow of people. I also time each sketch I do. I will do a few quick 10-30 second gesture sketches then begin developing a few longer sketches as I learn the animals movement patterns. Also if the exhibit has multiple inhabitants, such as a fish tank or a aviary, I will sketch two or three animals at once. Do not get frustrated if that sleeping bird moves out of position, just move on to another sketch or try to sketch the animal in motion.

Now for the part most of you have been waiting on, the sketches! Which sketch is your favorite? Do you have any experience with sketching at a zoo or aquarium? I want to know about it. Tell me in the comments below. And until next time, sketch away fellow artists and see what awaits you out in nature.


Monday, June 2, 2014

Let the Teaching Begin!

The past few months since leaving Midwestern State University in December have been full of ups and downs and exciting life changes. Returning to the Coastal Bend area has been a fun adventure and an eye opening experience. Corpus Christi is finally learning how to run with the big dogs and is growing quickly. 

The same goes for their art scene. This city is ready to grow and has a lot to learn before it become the shinning gem of the sea it deserves to be. Between a refurnished down town, art walks and craft markets this town's interest in art is quickly expanding. The Art Museum of South Texas has a strong presence, there are a few art galleries that are beginning to blossom, and the Art Center of Corpus Christi is becoming a place where the community can come to learn about art. 

I joined the Barry Brown Clay Studio earlier this year and have enjoyed working with the community there. I have participated in two exhibitions since I joined. I currently have a ceramics piece on display in the Member's Gallery at the Art Center of Corpus Christi and had two prints in the Earth, Wind and Sky Show this Spring. Also you can find a few of my pieces for sale at the Barry Brown Clay Studio.

The community at the Clay Studio have given me the chance to continue to grow as an artist, and now it is time for me to return the favor. June marks the first month that I will be teaching Beginning Wheel Throwing at the Art Center. I was honored to be asked to take over the program, and I have some exciting things in store for the class. I am looking forward to showing this community why I fell in love with art, and hopefully I will give them a new appreciation for ceramics.

If you live in the Coastal Bend and are interested in learning more about art you can check out the Art Center of Corpus Christi's website for more information on classes you can take. I am only one of many teachers ready to help you gain an appreciation for the arts. 

If you don't live in South Texas but still want to get involved then I encourage you to look for local art museums, galleries and centers in your area. You will be surprised to find what opportunities await you in the wonderful world of art.

Also keep an eye out for more posts about how my classes are going and keep an eye open for more opportunities to learn. You might want to be on the look out for some of my new pieces as well! I have some wonderful pieces to show you soon!

Thursday, March 20, 2014

Art140

Teresa Lopez @TeresasMind
Chaos meets beauty in an eruption of calming colors. No other painting help you better understand this balance. #VanGogh #Art140


If you haven't heard the Museum of Modern Art is revolutionizing the way we talk about art with their new project entitled Art140. On their website, you will find 6 images of famous works of art including Vincent Van Gogh, Gustav Klumt and
Umberto Boccioni. They then challenge you to do what you do best, tweet about them. It's time to start a conversation about art. MoMA and the rest of the art community want to know what you think, what you really think, about the artwork that is being talked about and created. What, in your eyes, is beautiful? What is not? Does it show you a deeper meaning to life or does it simply make you laugh at the idea that time and money was wasted to create it?

This idea is not new. We have been tweeting and posting our thoughts online for years now, but MoMA has given us a challenge. Take a few minutes out of your lives and tell us what you think. That video you are about to watch for the hundredth time featuring a cat jumping into a cardboard box will still be there when you are done. Let's start a conversation, a real conversation about art!

Once a day for the next few weeks, I am going to take up the challenge and tweet about what I feel when I look at art. Will you?

Tuesday, March 18, 2014

What I Have Been Up To!


It’s been a few months since my last blog, and wow has it been crazy! I graduated, moved, got married, joined a new studio, began the Lunamals adventure, sold some artwork, and am preparing to have work in a few gallery openings! It’s been an exciting ride of ups and downs that I could not begin to describe but it has all been worth it!

In December 2013, I graduated from Midwestern State University with my Bachelors in Fine Arts. While I was sad to leave Wichita Falls, I was extremely excited to begin my new life as a full-fledged artist. I am currently back in South Texas and have since married the love of my life, A J Lopez III. That’s right everyone I have a new name, Teresa Lopez. Don’t worry it’s the same me, just with a little twist. While we are still trying to find a place to settle in, we have been very happy doing what we love best, Art! A J is anxiously waiting for the blue skies that will glow in the backgrounds of his night photography. As for me I have been lucky enough to find a new studio to call my home. 

The Barry Brown Clay Studio, located a rock throw away from the beautiful Gulf of Mexico, has become my new home away from home! My first day back on the wheel was a wonderful reminder to why I love creating artwork. (Keep your eyes peeled from some of my creations to pop up on my website soon!) I have also had the privilege of becoming a member at the Art Center of Corpus Christi and have artwork currently displayed in the Member’s Gallery and The Barry Brown Clay Studio. Also I have entered two of my Printmaking pieces, “Those Who Wander” and “When You Wish,” into the Earth Wind and Sky Exhibit that will be on display from April 2-27, 2014 at the Art Center of Corpus Christi. I will give you more information on that as it gets closer.

But probably the most exciting news is that one of my artistic visions has started to come alive. I have been working on the Lunamals for almost a year, and I am happy to say that it has finally been released on the world! I will write another post later on this week about Lunamals to fill you in. If you are like me and would like a quick taste, simply go to www.Lunamals.wordpress.com or like us on Facebook to get all of the new post sent directly to your Facebook feed.

2014 is being to look like a great year, and I cannot wait to see what else this year has in store for me!

Tuesday, November 12, 2013

Wood Fire 2013


Every year we have a wood fire in Ceramics. We have been doing the wood fire at MSU for about 3 years now. This year I have quite a bit invested in this firing. My Cheeratah bones will be going into this fire as well as 4 cups. It takes about 4 days to prepare and fire it. And is an exciting process to be a part of. 

So the wood fire is a very interesting form of glaze fire. There are two major types of firing, bisque firing which takes a piece and takes the water out of the piece. It hardens the clay and makes is stable and strong. A glaze fire gives the piece color. There are varies types of glaze fires including wood, soda, raku, oxidation and reduction to name a few.
 
A wood fire uses natural wood to heat the kiln (a very large super oven) up to cone 10 which is 2350 degrees Fahrenheit. As the wood burns, it releases hot ash into the kiln which clings to each piece. This ash is the reason many artist fire wood kilns. Because of this we don't glaze the whole cup because we want the ash to create the color. We do however glaze the inside and the lip of the cup (shown in this picture). This glaze is food safe which mean that you can actually drink out of it after it's fired. With out this type of glaze you would get sick from drinking or eating off the piece.

This gunk is very important. It is called Wading. We use this material on the bottom of the pieces. It lifts the piece off the kiln shelf and keeps it from sticking. 

Glaze is an interesting material. We mix powders with water to create a liquid. This liquid is then put on a cup and as it dries it fills the pours of the cup and clings to the piece. If you were to touch the dried glaze it would flack off. When we put it in the kiln the glaze becomes a liquid again (it is basically liquid glass with other stuff in it...but that is a tutorial for another day) This liquid runs as it is fired and then as the kiln cools it hardens and forms the glaze most people are familiar with, colorful and permanently stuck to a cup.

As the ash flies around in the wood kiln it also sticks to the cup and creates even more gooey liquid that runs down the side of the pot. The wading keeps the glaze from sticking to the kiln shelf. Without it you would have a nice big hunk of stone attached to the bottom of your cup which would make it very difficult to drink out of. It would make a nice giant expensive coaster though.  

The wading is taken and rolled into small balls. It is then glued into place on the bottom of the cups. We use regular school glue because it will stick enough to make it through loading it in the kiln without falling off but we can still knock the little buggers off after it is done firing.  

Sadly, these places will not be exposed to the atmosphere or conditions (wood ash flying around) so they will remain the color of the natural clay body. So if you ever flip over a cup (without liquid in it, of course) and you see little circles you know that wading was used in those spots! 


All of the pots are placed outside in size order which makes it easier to stack them in the kiln.

We have seven outdoor kilns (4 shown) and three indoor. The other kilns seen in this picture (left to right) are our soda kiln, a kiln used for burning out investment for the sculpture students' bronze projects, and two computerized gas kilns. One is used primarily for bisquing and the other for glazing. All four of these kilns run on gas. 


In the picture to the left is our wood kiln. you can see the base of the chimney on the left and the door where we chunk in the wood on the far right. The large opening is where we will stack the pieces that are going to get fired. The kiln is made out of hard bricks and steel and will be hot to the touch when it is being fired.

So to give you and idea of whats going to happen, the kiln is separated into three basic chambers. The first is the one that houses the fire itself. The second is where the pots are and the third is the chimney.


In the first chamber, the wood gets placed in the door and the fire's base is where the kiln meets the concrete (two feet lower than the door). As the heat rises it hits the top of the arched roof and is sent into the second chamber where the pots will be. Because of the arch of the roof the flame will actually swirl around in the second chamber a few times before getting sucked into the third chamber, the chimney.


To the left is a better view of the inside of the kiln. You can see the low wall on the right which separates the top part of the fire from the second chamber. You can see on the roof and wall where the ash has hit the bricks as it was fired. These bricks were once white.


To the left, is a picture of the first chamber where the fire is held. This area is also called the firebox. You can see light pouring in through a small opening. This is where the wood will enter through. On the wall next to the opening are fourteen small gaps in the brickwork. Through these gaps we can control air flow and it is where we will rack out the extra coals that fall to the bottom of the fire box.


This is the left side of kiln. You can see 12 of the 16 holes where the fire will be sucked through and into the chimney. You can see where the fire has scorched the area around the holes. When you place the pots in the kiln you need to stay clear of this area or you will block the flow of air in the kiln.


The chimney is about two stories tall. When the kiln is being fired, flames will shoot out another 5 or 6 feet from that! The reason it is so tall is so that the smoke and ash that will go flying out of the kiln during the firing won't hit the building. Always call your local fire department before beginning a wood fire. You never know what can happen!


Steve Hilton, our professor, is demonstrating a technique called Carbon Trapping. What he is doing is heating the surface of a glazed pot with a torch. This will force the glaze to mature a little earlier than the others which will make it sticky. As the piece gets fired more ash and carbon will stick to these areas causing the piece to become black in those areas. Essentially he is painting black onto his pot with a blow torch.


Once all of the pots have been glazed and sorted the stacking begins. We are trying to get a lot of pots into the kiln so how you stack is very important. As we mentioned before glaze becomes a sticky liquid as it melts. You have to keep the pots far enough away from each other so that the glazes don't fuse the pots together during the firing. You also have to think about what kind of look you want on your pots. Areas close to the wall that divide the first and second chambers will have more ash deposited on the surface and tend to get hotter. Areas in the upper left hand corner of our kiln then to stay cooler and have less ash flow. There are other factors to keep in mind as well, some areas in the kiln will have more oxygen flow and some will have more smoke, both of which can effect the final look of the pot. Also a small piece placed next to a large piece can be shielded from heavy ash flow.

Once the pieces are all stacked and ready to go the second chamber is sealed shut. We are almost ready to begin.


Before we begin we need to make sure we have enough wood to burn. We fire our wood kiln for 24-48 hours. Some artists and studios will fire a kiln for upwards of 5 or 6 days. They do this to create different desired conditions in the kiln. By holding the temperature at the same temperature for long periods of time, you can create more ash flow. 


Once we have reached our desired temperature we close the kiln up and let the fire die down and cool naturally. It will take about two days to for our kiln to cool this way. Some artists will fire down their kiln, which means that they continue to add wood to their kiln but at slower rates. This allows the kiln to cool down very very slowly. By doing this you create environments in the kiln which allows for the glaze to crystallize creating very interesting looks on the pot. 

There are many different variations when firing a kiln. It takes years of experience and practice to find a method that works best for you. Always take good notes before, during and after every fire to keep track of what works and what doesn't.

After two days of hard preparation, we final light up the fire. Using rolled up newspaper and some dry wood the fire quickly catches and our long hours of firing begins. 

While we are always eager to get the fire going we have to be very careful during the first few hours of firing. There is still moisture in the pots and if we heat them to quickly they can crack or shatter. 

We begin by adding wood every 45 minutes or so to raise the kiln at a rate of 100-200 degrees and hour. Company is a must during these long hours. You can see 6 metal pole sticking out of the kiln. These poles hold the wood  that is being thrown into the kiln. As they burn and break apart they turn into coal and fall to the bottom of the fire box. We rack coals out of the kiln periodically and allow fresh hot coals to settle at the bottom of the firebox. 

Once the kiln reaches around 1000 degrees Fahrenheit the pots reach a stage called "red hot" where they literally glow red. At this point we can heat the kiln more quickly without fear of the pots breaking. At this point we add more wood to the kiln every time the temperature in the kiln drops. As the fire grows hotter we are adding more wood every 5-10 minutes and sometimes even faster than that. The coals start to pile up and they are constantly being racked out to make way for more wood. 

During this firing we reached our desired temperature 24 hours and 15 minutes after we began. This is our fastest firing to date. We found that thinly sliced wood burns more efficiently and hotter than large logs. 

We also had more smoke and ash flying through this kiln than any of our past firings. We believe that because we were firing hotter faster we were able to add more wood every time causing it to reduce before it reached each peak. When you add wood to the kiln the temperature rises at a steady rate once it has burned up it reaches its peak and then begins to fall. At that point you add more wood to continue the climb and it will peak again. At each peak is typically when we see the most reduction in the kiln as the fire burned up all of the oxygen. During this firing, however, we were reducing even as the kiln heated up before peaking. 

Because we hit our desired temperature so quickly we continued to add wood to the fire to allow for even more reduction. Once we were satisfied with our hard work (and we to tired to continue), we closed up the kiln and waited. It took a little over two days for the kiln to return to room temperature and at that point we opened up the kiln hoping for Christmas morning!


Here is a final look at the work that came out of this wood fire. I am very excited about this firing and the variety we were able to get. Some of the pieces we will have to re-fire in a cone 10 glaze kiln to melt some of the ash that deposited as the fire cooled. 

If you have any questions about this process, shoot me a message in the comments below. I hope you enjoyed this look at a ceramic wood fire!